IdeBagus - Web Design dan hosting untuk website Indonesia

Virgotech Search

Custom Search

23 December 2008

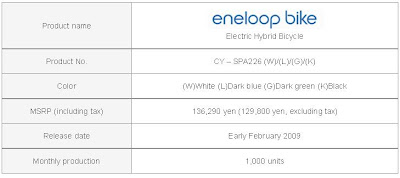
"Eneloop Bike" Electric Hybrid Bicycle


Concidering on Sanyo News Realase,
They Announces the “eneloop bike” Electric Hybrid Bicycle. This bikeThe eneloop bike has been designed to be the industry’s first*1 to conform to the newest standards*2, offering a “Power-up Mode” assist ratio of up to 1:2*2 making riding the bicycle more comfortable, a new “loop charge function”*3 that generates electricity and charges the battery while in use, and a “two-wheel drive system” provide a safer, more stable ride.

The new eneloop bike will be on sale in Japan in early February 2009.

SANYO, based on its ‘Think GAIA’ brand vision and the eneloop concept stressing ‘looping energy’ or stressing a lifestyle of reusing and recycling, created the ‘eneloop universe’ in 2006. The eneloop bike announced today will become a part of this product series, as it accurately represents both looping energy and consideration for the environment in a reusable system. With this new product, clean and reusable energy is “Generated, Recharged, and Conserved” simultaneously. Energy is generated by the rider, recharging the auxiliary battery, and conserving the energy both from the main battery and the rider.

Main Features


1. Industry’s First*1 to conform to the newest standards*2 with “Power-up Mode” assist ratio of up to 1:2*2 for more comfort

- Conforms to newly revised road traffic law enforcement regulations effective as of December 1, 2008 allowing motor to human power, assist ratio, to 1:2
- Power-up Mode offers riders more comfort by assisting more with its smooth assistance control
- New ratio allows riders to pedal up steep hills effortlessly
- SANYO’s proprietary ‘smooth assistance control’*4 aids with balancing the bicycle when pedaling starts, and allows a smooth ride

*1 For power-assisted bicycles in Japan that are scheduled to be released at the beginning of February 2009.

*2 A Cabinet Office regulation to be enforced on December 1, 2008 that revises the drive assist ratio for the motor drive-assisted bicycles that is provided in the road traffic law enforcement regulations.
The ratio of motor power to human power (assist ratio) will become 1:2 in a low-speed area of less than 10 km/h.


*3 The “Loop Charge Function” is a generic name of the “Brake Charge” where the motor changes to the dynamo and the battery is auxiliarily charged by a left brake lever operation when the bike slows down on a downhill for example, and the function where the motor brake automatically works while the bike coasts downhill in “Auto Mode” and the battery is auxiliarily charged. Even with the use of “Loop Charge”, the battery needs to be charged daily with a dedicated charger.

*4 As of December 2008 for assist bicycles in Japan for the running mode automatically controlling the optimal recharging rate downhill and the assist “power-up” for uphill.


Thanks

19 December 2008

How to Migrate data from PC to Mac


There are many ways to do this—some free (depending on the gear you own) and others not quite as free.

If you have a spare external hard drive with a USB interface you can use it to copy your parents’ files from the PC to the Mac. First, format the drive so that it can be used on the PC. To do so, plug the hard drive into the Mac, launch Disk Utility (found in the Utilities folder), select the drive in the left pane of the Disk Utility window, click the Erase tab, from the Volume Format pop-up menu choose MS-DOS (FAT), and click Erase. (And yes, this will erase all the data on the drive so be sure there’s nothing on that drive you want.) With the drive formatted for Windows, unmount it from the Mac, plug it into the PC, and copy the files you want from the PC to the hard drive. Unmount, drag it back to the Mac, plug it in, copy from hard drive to Mac, done.

This is a fine solution if you know where to find all the files on the PC and have the patience to archive email message, export bookmarks (termed Favorites in Internet Explorer), and sift through this corner or that to ensure you have all the files you need before setting fire to the PC.

If you’re without an external drive you can create a quick-and-dirty network between the two computers by stringing an Ethernet cable between them, switching on file sharing, and copying the files from Computer A to Computer B. Doing so requires that you know something about file sharing on both platforms (online help on each computer will explain how) and, again, you’ll need to know where to find the files you’re after.

A less-free-to-the-tune-of-$50 option is Belkin’s $50 Switch-To-Mac Cable. This is the solution I used because I had one and wanted to see how it worked. I’m pleased to say that it was a breeze. The gist is this:

You install Belkin's software on both the Mac and Windows PC (OS X 10.4 or later and Windows XP or Vista required). For the most part, the Mac software does the work. There you tell the application the kinds of files you want to copy from the PC to the Mac. You can choose music, photos, email, contacts, calendars, documents, wallpaper, and Internet Explorer Favorites as well as the contents of the PC’s Desktop and the contents of a folder you’ve chosen. Once you’ve set up the software, string the included cable between USB ports on each computer (transfer will happen more quickly over a USB 2.0 port on each computer but it works with USB 1.0 on a PC too). Then tell the Mac version of the application to work its magic and it does so by copying files from the PC to the Mac.

It doesn’t just fling files into a folder on your Mac but rather files them where they should be. Your Desktop files, for example, appear on the Desktop of your Mac in a folder labeled with the name of your PC. Music files are moved directly into iTunes. Photos are copied to iPhoto. Favorites become bookmarks in Safari. Outlook mail is shuttled to Apple’s Mail just as Outlook’s calendars appear in iCal and addresses show up in Address Book.

For a one-time job I can see how this $50 solution might be a little off-putting but, Great Googly Moogly, it is slick and easy. Were I required to do this thing more than a handful of times, I’d consider it money well spent. (Or I might just demand the necessary $50 from a relative or friend who requested my help for this kind of operation.)


Thanks

18 December 2008

How to convert DVD and video to BlackBerry Storm

This article is will show you about how to rip DVD and convert video to BlackBerry Storm. First, you should know what video format is BlackBerry Storm supports.
Because DVD has CSS copyright protection, we need a program to rip DVD and convert video for BlackBerry Storm. The tool we use is BlackBerry Converter Suite, it includes two programs: DVD to BlackBerry Storm Converter and BlackBerry Storm Video Converter. This program not only supports BlackBerry Storm, but also BlackBerry Curve, BlackBerry Pearl and BlackBerry Bold series.

It supports audio and video format as follow:

Video:
DVD, ISO, AVI, MPEG, MKV, MP4, MP4-AVC, M4V, WMV, MOV, 3GP, 3G2, MPG, FLV, ASF, VOB

Audio:
WMA, M4A, MP3, AAC, AC3, WMA

For more info about this BlackBerry Converter Suite, you can refer to here.
And here is the free download link, about 10.9 MB.

Now, let’s start the guide about converting DVD and Video to BlackBerry Storm:

Step1. Download and install the BlackBerry Storm converter, and then run it.

Step2. Load DVD into the software by clicking “Add DVD file”.

Here we can load three kinds of DVD’s:

1. Real DVD, just put the DVD in your DVD drive and click load DVD, (you can find it by clicking the triangle on the right of ‘load file’ button.)

2. DVD ISO image, you can amount your ISO files in the daemon tools and then load the virtual DVD drive.

3. A DVD folder, sometimes you may store the DVD folder in your hard drive, it appears like “Video_TS” “Audio_TS” folders. You can load it by clicking the “load DVD folders” button.

Step3. Select Profile, Subtitle, Audio, output directory setting

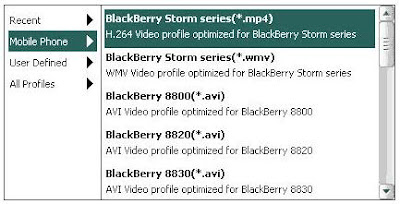
After you load DVD into the software, click the Profile drop-down list to select the proper format according to your BlackBerry Type, this guide is mainly about how to convert DVD and video to BlackBerry Storm, so we select the “BlackBerry Storm series(*.mp4)” profile.
Regular DVD movies usually have several subtitles such as English, French, German, etc. You can select one you prefer. You can also delete the subtitle by selecting “No Subtitle”. Selecting Audio is the same. If you want to join all your DVD files into one video file, please select the option named “Merge into one file”. For more advanced setting, you can open the setting panel by clicking “Setting”.

Step4
. Start the conversion

After all things done, you can click the “Start” to begin the conversion; it will take about 30 minutes for converting a regular two hours DVD movie. When the conversion finished, click “find target” to located the converted video on your computer, connect your BlackBerry Storm to computer, and then copy the video to your BlackBerry memory card, that’s all. Then you can enjoy your favorites DVD movies on your BlackBerry Storm.

For converting video to BlackBerry Storm, you can click “Video to BlackBerry” to run the BlackBerry Movie Converter, the operation steps are similar to DVD to BlackBerry Converter, So I’m not repeat here. But I want to add some tips to the BlackBerry Movie Converter.

1. The Video to BlackBerry Converter supports batch conversion, so you can add multiple video files at one time.
2. The Video to BlackBerry Converter embeds powerful video editing functions, you can use it to cut video, trim video, crop video, and you can even add a watermark to the video.
3. The Video to BlackBerry Converter can also help you convert video file to MP3, WMA, AAC, etc audio, so you can set it as your BlackBerry ringtone.

Thanks

17 December 2008

Set Monitor disk arrays with sccli commands on UNIX


Clearly one of the best features of disk arrays is that they can continue working even when a disk has failed. One of the problems, however, is that you might not notice when a disk fails, and thus, fail to replace it in a timely manner. Let’s take a look at what you can do to facilitate monitoring your storage (StorEdge) arrays so that a bad disk doesn’t escape your notice.

First, there are two ways to determine that a disk in a StorEdge array has failed. You might notice that an amber LED on the front of the particular drive has lit up or you can use the sccli commands to view the disks contained in your array and their status.

To start sccli, log into the server to which the array is attached and type “sccli”. You should connect to the device and find yourself sitting at the sccli> prompt. To view the state of the disks on your array, type “show disks”. In the display below, one of the disks is reported to be “BAD”. The particular system was still running and still had one disk in “STAND-BY” mode, so the failure was not an emergency. Still, it’s a good idea to ensure that all disks in the array are working properly to steer clear of failures from which your array would not be able to recover without intervention.